This article helps you group and filter your AncestryDNA® matches. For help finding specific DNA matches by name, username, or family tree details, see Searching AncestryDNA® Matches.
Grouping and filtering your AncestryDNA® matches can help you quickly find the DNA matches you’re interested in.
You can create groups and apply filters to sort your matches. You can use multiple groups or multiple filters at a time. For example, if you want to see new matches related to your biological mother, you can select the "Maternal" group and filter by "Unviewed." Then, you'll only see matches you haven't seen yet from your mother's side.
If you don't see any matches after applying a group or filter, try changing or clearing your selections.
Creating custom groups
Custom groups let you filter your matches by specific groups. With a DNA kit, you can create up to 24 groups. An Ancestry family history membership increases this limit to 64. Matches can belong to multiple groups.
To create a custom group:
- Above your list of DNA matches, click Create group.
- In the opened side panel, enter a group name for the group; you can use emoji. The group's icon will display whatever’s listed first in the group name. If it’s a letter, that letter will show on the icon. If it’s an emoji, that emoji will show on the icon.
To add emoji to group names:
- In the Group name field,
- On Apple/Mac, press Fn + E or
 + E until you see the character viewer.
 - On Windows/PC, press the Windows key
 and “.” (period) until you see the emoji keyboard.
- Use your mouse to select the emoji, character, or symbol you want. You can add more than one.
Need help? Check out Apple’s support for their Character Viewer or Microsoft’s support for their Emoji Keyboard.
- Assign a color for the group.
- Click Create group.
Adding or removing matches from groups
When adding or removing matches from groups, here’s what you’ll see:
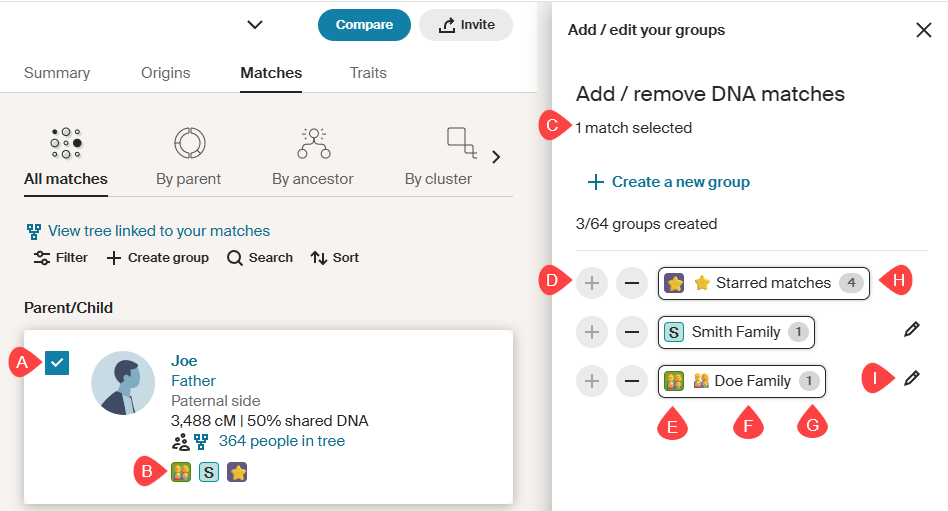
- Selection boxes: Boxes you can select or deselect to choose which matches you want to add or remove from groups.
- Group icon(s): indicate the group(s) a match is currently in.
- If a match is in more than one group, you'll see an icon for each group they’re in.
- Hovering your mouse over these group icons will show the group’s name and total number of matches in that group.
- Circled number above your groups: tells you the total number of matches you currently have selected in your match list.
- + - : “+” adds and “-” removes all selected matches from a group.
- Individual group icon: is the icon that will represent that group.
- Group name: This is the name of the group.
- Circled numbers next to group names: indicate the total number of matches currently in that group.
- Outlined group name: means at least one (but not necessarily all) of your selected matches is in that group. If a group is not outlined, none of your selected matches are in that group.
- Pencil: lets you change the custom group's name and color.
To add or remove matches from a group:
- Next to a match, click + Add and choose Add/Edit Groups.
- Still in your match list, select the boxes next to all the matches you want to add to or remove from a group.
- In the opened side panel, click the + or - sign next to the group(s) you want to add matches to or remove matches from.
- Pressing + will add all selected matches to the group. If “+” is grayed out, all selected matches are already part of the group and can’t be added.
- Pressing - will remove all selected matches from the group. If “-” is grayed out, none of the selected matches are part of the group and can’t be removed.
- Adding or removing all selected matches (A) to/from a group may not change the total number of matches in that group (G) by the same number as the selected matches (C). This is because some of the selected matches may already be in, or not in, the group you're modifying.
- (Optional) Repeat steps 2 and 3 for each group.
- At the bottom of the opened side panel, click Save changes.
Once someone is added to a group and the changes are saved, you'll see the group’s icon next to them in your match list. If they're in more than one group, you'll see an icon for each group.
Once someone is removed from a group and the changes are saved, that group's icon will no longer appear next to them in the match list.
Editing or deleting groups
Deleting a group doesn't delete your matches; it just removes them from the group. Deleting a group is permanent, so if you want it back, you'll need to recreate it and add everyone to it again.
- Next to any match, click + Add and choose Add/Edit Groups.
- In the opened side panel, click the pencil
 next to the group you want to change or delete.
- To change the group’s name or color, make your changes and click Save group.
- To delete the group, click Delete, then confirm by clicking Delete again.
Filtering
- Above your list of DNA matches, click Filter.
- In the panel on the right, select one or more groups and filters. If needed, click the down arrow V next to a category to expand the section and choose those filters.
- At the bottom of the opened side panel, click Apply filters.
If you don't see any matches after applying a group or filter, try changing or clearing your selections.
Here are the filters you can select:
- Unviewed: matches you haven't viewed yet, marked with green dots.
- Common ancestors: Matches who have ancestors with the same name and details in their linked family tree as you do in yours. Your tree must be linked to your DNA test to see your common ancestors.
- New: DNA matches that have recently been added.
- Notes: matches you’ve added information about.
- Hidden matches: matches you’ve chosen to hide.
- Trees:
- All: matches with or without family trees (public or private) linked to their DNA.
- Private linked trees: matches with a private tree linked to their DNA. You need their permission (granted through a tree invitation) to view these trees.
- Public linked trees: matches who have linked a public tree to their DNA, which you can see with an Ancestry family history membership.
- Unlinked trees: matches without any linked trees.
- Shared DNA:
- All matches: all DNA matches, regardless of their predicted relationship or amount of shared DNA.
- Close matches-4th cousin or closer: DNA matches we predict to be 4th cousins or closer based on the amount of DNA you share.
- Distant matches: DNA matches we predict to be 5th cousins or higher based on the amount of DNA you share.
- Custom centimorgan range: Set a DNA range to filter by.
- Groups:
- Starred matches: matches you’ve marked as favorites.
- Custom groups: matches you’ve added to groups you’ve made.
- Journeys:
- Journeys you have: Shows journeys included in your DNA results.
- Select one or more to see only your matches who share those same journeys.
- Parent:
- Your labels:
- All matches: all matches, regardless of their family connection.
- Maternal: matches you’ve assigned relationships to and marked as being from your mother’s side.
- Paternal: matches you’ve assigned relationships to and marked as being from your father’s side.
- Both sides: matches you’ve assigned relationships to and marked as being from both your mother’s and father’s families.
- Ancestry labels:
- Maternal: matches shared with your biological mother.
- Paternal: matches shared with your biological father.
- Both sides: matches shared with both of your biological parents.
- Unassigned: matches we need more information about to assign to a parental side.
Filtering out types of matches
To filter out types of matches, choose all groups or filters except the ones you don’t want to see. For example, if you want to see all matches except the ones you’ve starred, select all groups and filters except the “Starred matches” group.
Note, if other groups and filters apply to a match, they may still appear in the list
Filtering matches by parental side
If at least one of your biological parents has taken an AncestryDNA test, your matches will automatically be labeled by parental side into groups called "Maternal" for your Mother’s side or "Paternal" for your Father’s side. You'll also see these labels next to each of your matches.
If neither parent has taken an AncestryDNA test, you can quickly label your matches’ parental side with help from our SideView™ technology. To do this:
- Above your list of matches, select the By parent tab.
- Under Parent 1 or Parent 2, select Edit parent.
- In the opened side panel, choose Maternal or Paternal.
- Click Confirm.
Your matches will now be assigned “Maternal” or “Paternal” based on what you chose.
You can also add the parental side a match is related to by Assigning Relationships to AncestryDNA® Matches.
To see the matches from one side of your family:
- Above your list of matches, click Filter.
- In the opened side panel, choose Parent.
- Under Ancestry labels select Maternal or Paternal, or use the custom-labeled maternal/paternal options.
- Click Apply filters.